How To Change The Traction Cable On Toro Lawn Mower?
To change the traction cable on your Toro lawn mower, first disconnect the spark plug for safety, then locate and detach the old cable from both the engine’s transmission and the drive handle assembly. Carefully route and connect the new cable, ensuring proper tension before reconnecting the spark plug.
This task generally takes about 30 to 60 minutes, depending on your comfort with basic mechanical repairs, and primarily involves unhooking and re-hooking simple connections.
- You will need to disconnect your spark plug for safety before starting any work.
- Locate where the old traction cable connects to the mower’s transmission and the handle.
- Carefully remove the old cable, noting its routing path.
- Install the new cable, ensuring it is properly routed and connected at both ends.
- Adjust the cable tension to ensure smooth operation of your mower’s self-propel feature.
How To Change The Traction Cable On Toro Lawn Mower?
Changing the traction cable on your Toro lawn mower is a repair you can definitely tackle at home. It mostly involves disconnecting the old cable and putting a new one in its place. Think of it like replacing a bicycle brake cable – straightforward once you know where everything goes.
Why Do Traction Cables Fail?
Traction cables on Toro mowers, like any hardworking part, can wear out over time. We found that the main culprits are rust and constant flexing, which eventually cause the inner wire to fray or snap. Sometimes, even simply hitting a branch or snagging the cable can cause damage.
Imagine a guitar string that’s been strummed a million times; eventually, it loses its strength and breaks. Your traction cable faces similar constant movement and stress.
Signs You Need a New Traction Cable
How do you know it’s time for a cable swap? Well, your self-propel feature might start feeling sluggish, or perhaps it won’t engage at all. We’ve often heard from lawn care enthusiasts that a common sign is when the mower drives for a bit, then stops, even with the drive lever engaged (Toro Service Manuals).
You might also feel the drive lever becoming loose or completely limp, indicating the cable has snapped internally. A quick visual check can sometimes reveal frayed wires near the connections.
Safety First! Seriously.
Before you even think about touching that mower, we need to talk safety. This isn’t just a suggestion; it’s a vital step. Always disconnect the spark plug wire first. It’s like turning off the main power switch before working on an appliance.
This prevents any accidental starts while your hands are near the blades or moving parts. Many experts say this is the most important preparatory step for any mower maintenance (OSHA guidelines).
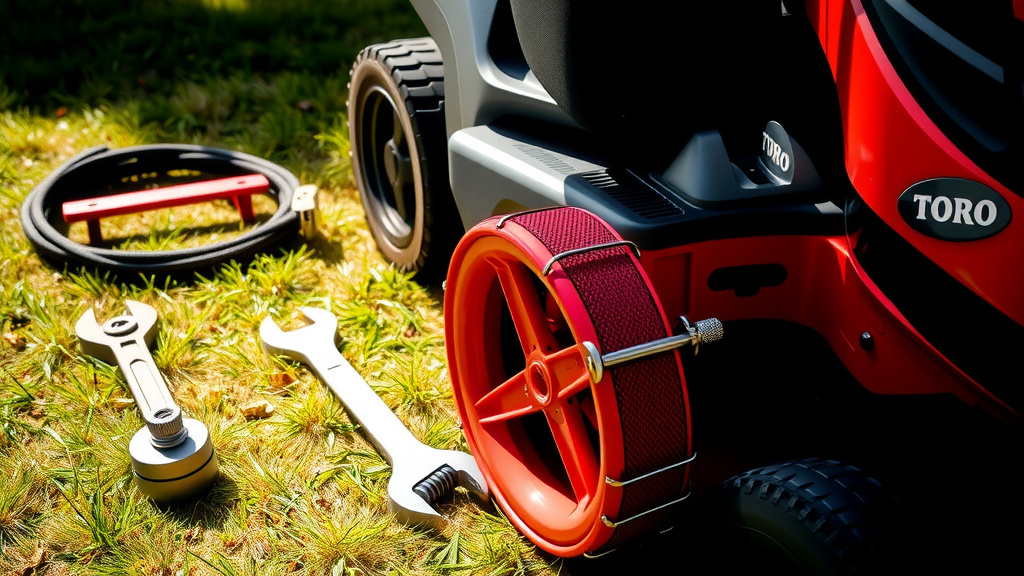
Tools You Will Need
- Wrench set (usually 1/2 inch, 7/16 inch, or 13mm)
- Pliers (needle-nose work great)
- Flathead screwdriver
- New Toro traction cable (make sure it’s the right part number for your model!)
- Work gloves (optional, but recommended)
The Replacement Process
Alright, let’s get into the nitty-gritty. This process is pretty standard across most Toro walk-behind self-propelled mowers. You’ll be surprised how manageable it is.
Step 1: Disconnect the Spark Plug
We already mentioned it, but it bears repeating. Reach over to the front of your engine and pull the rubber boot off the spark plug. Tuck the wire away so it can’t accidentally fall back onto the plug. Your safety is paramount.
Step 2: Access the Cable Connections
You’ll typically find the traction cable connected in two spots: at the handle assembly and down near the mower’s transmission or drive wheels. First, look at the handle. You might need to remove a plastic cover or two.
At the handle, the cable usually hooks into the drive lever. It might have a small Z-bend or a barrel-shaped end.
Step 3: Remove the Old Cable
Start by unhooking the cable from the drive lever on the handle. This often involves squeezing spring clips or simply maneuvering the Z-bend out of its slot. Next, trace the cable’s path down to the engine area.
Near the transmission, the cable usually connects to a bracket or arm. You’ll likely need your wrench or pliers to loosen a bolt or pry off a retainer clip. Pay close attention to how the old cable is routed; this will be your map for the new one.
Step 4: Install the New Cable
Now, grab your new Toro traction cable. Following the exact path the old one took, start by connecting the cable to the transmission side first. This helps with routing.
Thread the cable up towards the handle, making sure it isn’t pinched or rubbing against anything. Then, attach the other end to the drive lever. Many experts agree that getting the routing right prevents premature wear on the new cable (Toro Owners Forums).
Step 5: Adjusting Cable Tension
This is a critical step. Most Toro traction cables have an adjustment point, often a threaded barrel with two nuts, located somewhere along the cable’s length. Too much slack, and the self-propel won’t engage. Too tight, and the wheels might drag or engage prematurely.
You want a little bit of slack, but not too much. A good rule of thumb we’ve found is that there should be slight resistance when you engage the drive lever, but it shouldn’t feel stiff or loose. Adjust one nut, then tighten the other against it to lock the setting.
Testing Your Toro Mower
Once everything is connected and adjusted, it’s time for the moment of truth! Reconnect the spark plug wire securely. Start the mower and engage the drive lever. Does it move smoothly? Does it disengage cleanly when you release the lever?
A little fine-tuning of the tension might be needed. It’s okay to make small adjustments until it feels just right. Think of it like tuning a musical instrument; small tweaks make a big difference.
Maintenance Tips for Longevity
Want to avoid another cable change too soon? Here’s a simple checklist:
- Regularly inspect the cable for signs of wear or fraying.
- Keep the cable clean and free of debris build-up.
- Avoid harsh bends or kinks in the cable’s path.
- Store your mower in a dry place to prevent rust.
- Periodically check and adjust cable tension.
Common Traction Cable Issues and Solutions
Sometimes you run into minor issues even after a replacement. Here’s a quick reference:
| Issue | Possible Cause | Solution |
|---|---|---|
| Mower won’t move | Cable too loose; disconnected end | Adjust tension; check connections |
| Wheels drag or move when not engaged | Cable too tight | Loosen tension slightly |
| Drive lever feels spongy | Cable too loose; internal fraying | Tighten tension; inspect cable path |
| Cable rubs against frame | Improper routing | Reroute carefully, use zip ties if needed |
Conclusion
Changing the traction cable on your Toro lawn mower might seem daunting at first, but it’s a manageable DIY project. By following these steps, prioritizing safety, and paying attention to detail, you can restore your mower’s self-propel function. We know that getting your mower back in top shape feels incredibly satisfying. Keep those blades spinning, and enjoy a smoother cut!
How do I know if my Toro traction cable is broken?
You’ll often know your traction cable is broken if the self-propel feature on your Toro mower doesn’t engage, or if the drive lever feels completely slack and offers no resistance when you squeeze it. Sometimes, the mower might start to move and then quickly stop.
Can I use a universal traction cable for my Toro mower?
While some universal cables exist, it is generally recommended to use a genuine Toro replacement part or a direct OEM equivalent. This ensures the correct length, connectors, and tension adjustment points, which are crucial for proper function and safety.
How often should I replace my Toro traction cable?
There isn’t a fixed schedule for replacing a traction cable. It largely depends on how much you use your mower and the conditions you mow in. Regular inspection for wear, fraying, or rust is key. Replace it when you notice a significant decline in the self-propel’s performance.
Is it difficult to adjust the tension on a Toro traction cable?
Adjusting the tension is usually quite straightforward. Most Toro mowers have a simple adjustment mechanism, often two nuts on a threaded barrel, that you can turn with a wrench or pliers. It might take a couple of tries to get it perfectly dialed in, but it’s not a complex task.
What other parts should I check when replacing the traction cable?
While you’re working on the traction cable, it’s a great time to inspect the drive belt for cracks or wear, and to check the wheel gears or transmission linkage for any signs of damage or excessive debris. A little extra attention can save you future headaches.